How to Repair Conveyor Belt with Practical Methods

Conveyor belts are critical components in various industries, yet they are prone to common issues such as tears, rips, and general wear over time. Understanding how to repair conveyor belt problems is essential for maintaining productivity and avoiding costly downtime. Regular inspections can help identify early signs of damage, allowing for prompt and effective repairs. By addressing these issues quickly, businesses can ensure their conveyor systems run smoothly and efficiently. Learning how to repair conveyor belt issues not only extends the life of the equipment but also optimizes operational efficiency, reducing the risk of unexpected breakdowns and production halts.
How to Repair Conveyor Belt: Types of Conveyor Belt Damage
Understanding the various types of damage that can occur to conveyor belts is a crucial first step in knowing how to repair conveyor belt issues effectively. Conveyor belts are subject to a variety of stresses and wear and tear during their operation, leading to several common types of damage. These damages, if not addressed promptly, can lead to significant operational disruptions. Below are detailed explanations of different types of conveyor belt damage, along with practical examples to illustrate each type.
Punctures
Punctures are one of the most common types of conveyor belt damage. They occur when a sharp object penetrates the belt, creating a hole. Punctures can vary in size and severity, depending on the nature of the object and the force of impact. For instance, a piece of sharp metal debris can cause a small puncture, while larger objects might create more significant holes.To repair punctures, it is essential to use a patch kit designed specifically for the conveyor belt material. The process involves cleaning the area, applying adhesive, and securing the patch firmly to restore the belt’s functionality.
Rips
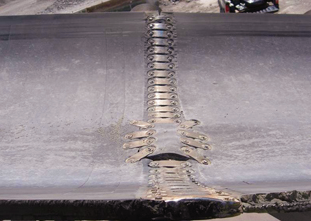
Rips in conveyor belts are more severe than punctures and often result from heavy loads, improper belt alignment, or foreign objects. Rips can start small but can quickly expand if not addressed, leading to significant downtime and repair costs.To repair rips, a rip repair kit with specialized fasteners or vulcanizing patches is used. The belt is cut at the rip, cleaned, and then stitched or patched securely to restore its strength and functionality.
Longitudinal Tears
Longitudinal tears run along the length of the conveyor belt and are often caused by continuous stress and strain, poor maintenance, or manufacturing defects. These tears can severely weaken the belt and necessitate significant repairs or replacement.Repairing longitudinal tears typically involves using a combination of adhesive and mechanical fasteners to ensure the repair can withstand the operational stresses. Vulcanization might also be employed for a more permanent fix.
Worn Edges
Worn edges on a conveyor belt indicate uneven wear and can result from misalignment, improper loading, or friction against the conveyor structure. Over time, worn edges can lead to belt failure if not corrected.To repair worn edges, the belt must be realigned to prevent further wear. Additionally, edge reinforcement strips can be applied to strengthen the belt and prevent future damage.
Understanding how to repair conveyor belt damage is critical for maintaining the efficiency and longevity of the conveyor system. By identifying and addressing punctures, rips, longitudinal tears, and worn edges promptly, businesses can minimize downtime and extend the life of conveyor belts. Implementing regular maintenance and inspections is key to detecting issues early and applying the appropriate repair methods to keep the belts running smoothly.
How to Repair Conveyor Belt: How to Locate Conveyor Belt Repair Services
When it comes to maintaining and repairing conveyor belts, finding the right repair service is crucial. Knowing how to repair conveyor belt issues is important, but locating professional repair services can save time, ensure quality repairs, and extend the life of your equipment. This section provides detailed tips on finding local conveyor belt repair services and emphasizes the importance of choosing experienced technicians for reliable repairs.
Tips on Finding Local Conveyor Belt Repair Services
Searching for local repair services for conveyor belts can be straightforward if you know where to look and what to consider. Here are some practical tips to help you find the best services for “how to repair conveyor belt near me”:
Online Search Engines and Directories
- Use search engines like Google and online business directories such as Yelp or Yellow Pages to find local conveyor belt repair services. Keywords like “how to repair conveyor belt near me” can provide a list of nearby service providers. Look for companies with high ratings and positive reviews.Searching “how to repair conveyor belt near me” on Google yields a list of local repair shops, complete with customer reviews and contact information.
Industry Referrals
- Ask for referrals from industry colleagues or suppliers who might have experience with local repair services. They can provide recommendations based on their firsthand experiences.A colleague in the manufacturing industry recommends a reliable local company that specializes in conveyor belt repairs.
Trade Associations and Professional Networks
- Join trade associations and professional networks related to your industry. These organizations often have directories or member listings of service providers specializing in conveyor belt repairs.The Conveyor Equipment Manufacturers Association (CEMA) provides a list of certified repair services in various regions.
Local Equipment Suppliers
- Contact local suppliers of conveyor belts and related equipment. These suppliers often have partnerships with repair services and can recommend trusted professionals.A local supplier of conveyor systems suggests a repair service they regularly work with, ensuring a level of quality and reliability.
Online Reviews and Testimonials
- Check online reviews and testimonials on the websites of repair services. Customer feedback can give you insights into the reliability, quality, and customer service of potential repair providers.Reading detailed reviews on Yelp helps you choose a repair service with a track record of prompt and effective repairs.
Importance of Choosing Experienced Technicians for Reliable Repairs
Selecting experienced technicians for your conveyor belt repairs is crucial for ensuring long-lasting and reliable solutions. Here’s why experience matters and how to identify qualified professionals:
Technical Expertise
- Experienced technicians have extensive knowledge of various conveyor belt systems and materials. They can accurately diagnose issues and recommend the most effective repair methods.An experienced technician quickly identifies a longitudinal tear and uses specialized vulcanizing equipment to perform a seamless repair.
Quality Assurance
- Technicians with years of experience adhere to high-quality standards, ensuring that repairs are durable and effective. They are less likely to cut corners and more likely to use the best materials and techniques.A seasoned repair service uses top-grade adhesive and fasteners, ensuring the repaired belt can handle the operational stress.
Efficiency and Timeliness
- Experienced professionals can complete repairs more efficiently, reducing downtime and minimizing disruption to your operations. Their familiarity with common issues and repair techniques allows them to work quickly and accurately.An experienced team repairs a conveyor belt overnight, allowing the factory to resume operations the next morning without significant downtime.
Safety Compliance
- Experienced technicians are well-versed in safety regulations and best practices, ensuring that repairs are performed safely and comply with industry standards. This reduces the risk of accidents and further damage.A certified technician follows strict safety protocols during repairs, preventing workplace accidents and ensuring the repaired belt meets all regulatory requirements.
Long-Term Solutions
- Rather than providing temporary fixes, experienced technicians offer long-term solutions that address the root cause of the problem. This approach helps prevent recurring issues and extends the lifespan of your conveyor belt.An expert technician not only repairs a rip but also adjusts the conveyor belt alignment and tension to prevent future tears.
Knowing how to repair conveyor belt issues is essential, but finding the right local repair services can make the process much more efficient and reliable. Utilize online search engines, industry referrals, trade associations, local suppliers, and online reviews to locate reputable repair services near you. Additionally, prioritize choosing experienced technicians for their technical expertise, quality assurance, efficiency, safety compliance, and ability to provide long-term solutions. By following these tips, you can ensure your conveyor belts are maintained and repaired to the highest standards, minimizing downtime and enhancing operational efficiency.
How to Repair Conveyor Belt: Overview of Conveyor Belt Repair Kits
When it comes to addressing conveyor belt damage, having the right repair kit on hand is essential. Understanding how to repair conveyor belt issues effectively involves knowing what tools and materials are included in a repair kit and how to choose the best kit for your specific needs. This section provides a comprehensive overview of conveyor belt repair kits, detailing their components and offering guidance on selecting the appropriate kit for various situations.
What a Conveyor Belt Repair Kit Includes
Conveyor belt repair kits are designed to provide all the necessary materials and tools needed to perform quick and effective repairs. These kits typically include adhesives, patches, and fasteners, each playing a critical role in the repair process. Here are the main components you can expect to find in a conveyor belt repair kit:
Adhesives
- Adhesives are essential for bonding patches and repairing small tears or holes in the belt. They come in various formulations, including rubber cement, epoxy, and urethane-based adhesives. These substances ensure a strong and durable bond, capable of withstanding the stresses of conveyor operation.A high-strength rubber adhesive that cures quickly, providing a flexible but firm bond for minor repairs.
Patches
- Patches are used to cover and seal larger tears, holes, or worn areas on the conveyor belt. They are typically made from materials compatible with the belt, such as rubber or fabric-reinforced rubber, to ensure a seamless repair.A fabric-reinforced rubber patch designed to withstand heavy loads and abrasive materials, ideal for industrial applications.
Fasteners
- Fasteners are mechanical components used to join sections of the conveyor belt or secure patches in place. They can include rivets, bolts, and clamps, providing a sturdy and reliable connection.Metal rivets and bolts designed for high-tension areas of the belt, ensuring a secure and lasting repair.
Vulcanizing Solutions
- Vulcanizing solutions are used in the process of heat or chemical vulcanization, which creates a strong bond between the repair material and the conveyor belt. These solutions are particularly effective for creating permanent repairs that integrate seamlessly with the existing belt.A vulcanizing solution kit that includes a portable vulcanizing press and curing agents for on-site repairs.
Tools
- Repair kits often include specialized tools required for the repair process, such as scrapers, rollers, and clamps. These tools help prepare the damaged area, apply adhesives, and secure patches and fasteners.A scraper for cleaning the damaged area, a roller for ensuring even adhesive application, and clamps for holding the patch in place during curing.
Different Types Available in the Market and How to Select the Right One
There are various types of conveyor belt repair kits available in the market, each designed for specific types of belts and damage. Selecting the right kit involves considering the nature of the damage, the type of conveyor belt, and the operational environment. Here’s a guide to help you choose the most suitable repair kit:
Emergency Repair Kits
- These kits are designed for quick, temporary repairs to minimize downtime and keep the conveyor running until a permanent fix can be made. They typically include fast-curing adhesives and basic patches.An emergency repair kit with quick-setting epoxy adhesive and rubber patches, ideal for on-the-spot repairs in a busy manufacturing plant.
Heavy-Duty Repair Kits
- Heavy-duty repair kits are intended for more significant damage and demanding environments. They include high-strength adhesives, reinforced patches, and robust fasteners to handle high loads and abrasive materials.A heavy-duty kit with fabric-reinforced patches, industrial-grade adhesives, and metal fasteners, suitable for mining or quarry operations.
Vulcanizing Repair Kits
- These kits use vulcanizing techniques to create strong, permanent repairs. They are ideal for critical applications where the repair needs to be as durable as the original belt.A vulcanizing repair kit with a portable vulcanizing press, curing agents, and detailed instructions for on-site repairs.
Cold Bonding Repair Kits
- Cold bonding kits use adhesives that cure at room temperature, making them suitable for environments where heat vulcanization is impractical. They are convenient for quick and durable repairs.A cold bonding kit with a two-part adhesive system and rubber patches, perfect for repairs in temperature-sensitive environments.
Specialized Repair Kits
- Some kits are tailored for specific types of conveyor belts, such as those used in food processing, which require food-grade materials and adhesives. Others might be designed for specific types of damage, like edge wear or punctures.A food-grade repair kit with non-toxic adhesives and patches, compliant with industry standards for food processing belts.
Understanding how to repair conveyor belt issues effectively requires having the right repair kit. These kits typically include adhesives, patches, fasteners, vulcanizing solutions, and specialized tools. There are various types of repair kits available, such as emergency repair kits, heavy-duty repair kits, vulcanizing repair kits, cold bonding repair kits, and specialized repair kits. Selecting the appropriate kit involves considering the type of damage, the specific conveyor belt, and the operational environment. By choosing the right repair kit, you can ensure efficient, reliable, and long-lasting repairs, minimizing downtime and maintaining the productivity of your conveyor systems.
How to Repair Conveyor Belt: Using Conveyor Belt Repair Glue
Conveyor belt repair glue is an essential tool for addressing minor damages such as small tears, punctures, and worn areas. Knowing how to repair conveyor belt issues using repair glue can save time and reduce downtime, ensuring that the conveyor system continues to operate smoothly. This section provides a detailed step-by-step guide on using conveyor belt repair glue and explores the different types of glue available, along with their specific applications.
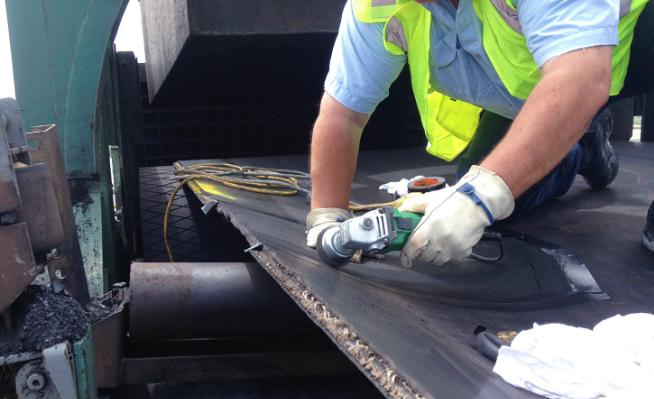
Step-by-Step Guide on How to Use Conveyor Belt Repair Glue for Minor Damage
Repairing minor conveyor belt damage with glue is a straightforward process that involves cleaning, applying the adhesive, and allowing it to cure. Follow these steps to effectively repair your conveyor belt:
Identify the Damage:Carefully inspect the conveyor belt to locate the area of damage. Look for small tears, punctures, or worn sections that need repair.
Clean the Damaged Area:Thoroughly clean the damaged area to remove any dirt, debris, or residue. Use a wire brush or scraper to ensure the surface is clean and dry. This step is crucial for ensuring a strong bond.Use a wire brush to remove debris from a small tear caused by a sharp object.
Prepare the Adhesive:Prepare the conveyor belt repair glue according to the manufacturer’s instructions. Some adhesives come as two-part systems that need to be mixed before application.
Apply the Glue:Apply a generous amount of glue to the damaged area, ensuring even coverage. Use a spatula or brush to spread the adhesive smoothly over the surface.For a puncture, apply the glue in a circular motion to cover the entire hole and surrounding area.
Press and Secure the Patch (if needed):If the repair requires a patch, place it over the glued area and press firmly. Use a roller to ensure the patch adheres evenly and remove any air bubbles.Place a rubber patch over a small tear and use a roller to secure it in place.
Allow the Glue to Cure:Allow the adhesive to cure according to the manufacturer’s recommended curing time. This can range from a few hours to 24 hours, depending on the type of glue used.Let a fast-curing adhesive set for at least 4 hours before resuming belt operation.
Inspect the Repair:After the glue has fully cured, inspect the repair to ensure it is secure and the belt surface is smooth. Perform a test run to verify the repair’s effectiveness.Run the conveyor belt at low speed to check the integrity of the repair.
Types of Glue Available and Their Specific Applications
Different types of conveyor belt repair glue are designed for various applications and materials. Here are five common types of glue and their specific uses:
Rubber Cement
- Rubber cement is commonly used for minor repairs on rubber conveyor belts. It provides a flexible bond that can withstand movement and vibration.Use rubber cement to fix small punctures and tears on a rubber conveyor belt in a manufacturing plant.
Urethane-Based Adhesive
- Urethane-based adhesives offer strong, durable bonds suitable for high-stress areas. They are resistant to chemicals and abrasion, making them ideal for industrial environments.Apply urethane-based adhesive to repair tears in a conveyor belt used in a mining operation, where resistance to abrasive materials is crucial.
Epoxy Adhesive
- Epoxy adhesives are known for their strong bonding properties and are suitable for repairing both rubber and fabric-reinforced belts. They can handle high loads and harsh conditions.Use epoxy adhesive to repair a longitudinal tear in a fabric-reinforced conveyor belt in a heavy-duty processing facility.
Silicone-Based Adhesive
- Silicone-based adhesives are flexible and can withstand extreme temperatures. They are ideal for environments with significant temperature variations.Repair a conveyor belt in a food processing plant where the belt is exposed to both hot and cold conditions using silicone-based adhesive.
Cold Vulcanizing Adhesive
- Cold vulcanizing adhesives create a chemical bond that mimics the strength of vulcanized rubber. They are used for permanent repairs without the need for heat.Use cold vulcanizing adhesive to permanently repair a large tear in a rubber conveyor belt in a quarry.
Knowing how to repair conveyor belt issues with repair glue is a valuable skill that can help maintain the efficiency and longevity of your conveyor systems. The process involves identifying and cleaning the damaged area, applying the appropriate adhesive, and allowing it to cure properly. There are various types of glue available, including rubber cement, urethane-based adhesive, epoxy adhesive, silicone-based adhesive, and cold vulcanizing adhesive, each suited for specific applications. By selecting the right type of glue and following the step-by-step guide, you can ensure effective and durable repairs for minor conveyor belt damage.
How to Repair Conveyor Belt: Conveyor Belt Rip Repair Techniques
Conveyor belt rips are a common issue that can cause significant disruptions in industrial operations. Knowing how to repair conveyor belt rips effectively is crucial for maintaining productivity and preventing further damage. This section provides detailed instructions on repairing rips using rip repair kits and fasteners, and discusses the use of mechanical fasteners versus vulcanization methods.
How to Repair Rips in Conveyor Belts Using Rip Repair Kits and Fasteners
Repairing rips in conveyor belts requires a systematic approach to ensure a durable and effective repair. Here’s a step-by-step guide on how to repair conveyor belt rips using a rip repair kit and fasteners:
Safety First
- Ensure the conveyor system is shut down and locked out to prevent accidental startup during the repair process. Wear appropriate personal protective equipment (PPE) such as gloves, safety glasses, and a hard hat.
Inspect the Damage
- Carefully inspect the rip to assess its length and depth. This will help determine the extent of the repair needed and the materials required from the rip repair kit.
Prepare the Damaged Area
- Clean the area around the rip to remove dirt, debris, and any loose materials. Use a wire brush or scraper to ensure a clean surface, which is essential for the adhesive and fasteners to bond effectively.
Apply the Adhesive
- Using the adhesive included in the rip repair kit, apply a generous amount along the edges of the rip. Make sure to spread the adhesive evenly to cover the entire damaged area. The adhesive helps to bond the repair materials to the belt.
Install the Patch
- Place the patch material from the kit over the rip. Ensure the patch extends beyond the rip on all sides to provide sufficient coverage and strength. Press the patch firmly onto the adhesive to ensure a good bond.
Secure with Fasteners
- Use the mechanical fasteners provided in the kit to secure the patch. Typically, these fasteners are metal rivets or bolts designed to hold the patch in place. Space the fasteners evenly along the edges of the patch, ensuring they are tightly secured.Install metal rivets at 2-inch intervals around the patch to ensure it stays firmly in place.
Curing Time
- Allow the adhesive to cure according to the manufacturer’s instructions. This is a crucial step to ensure the repair material bonds properly with the conveyor belt. The curing time can vary, but it generally ranges from a few hours to 24 hours.
Inspect the Repair
- Once the adhesive has fully cured, inspect the repair to ensure the patch is securely in place and the fasteners are tight. Perform a test run of the conveyor belt at a slow speed to check the integrity of the repair.
Resume Operations
- After confirming the repair is solid and secure, the conveyor system can be restarted. Monitor the repaired area during the initial operation to ensure it holds up under normal working conditions.
Discuss the Use of Mechanical Fasteners vs. Vulcanization Methods
To repair a conveyor belt, assess the damage to determine the appropriate repair method, whether it’s a small puncture or a significant tear. When it comes to repairing conveyor belt rips, there are two primary methods: mechanical fasteners and vulcanization. Each method has its advantages and is suited for different types of repairs and operational requirements.
Mechanical Fasteners
Mechanical fasteners are widely used for conveyor belt repairs due to their ease of installation and versatility. They involve using metal rivets, bolts, or clips to secure repair materials to the belt.
- Advantages:
- Quick Installation: Mechanical fasteners can be installed quickly, minimizing downtime. This is particularly useful for emergency repairs.
- Ease of Use: No special equipment or extensive training is required, making it accessible for in-house maintenance teams.
- Flexibility: Suitable for a wide range of belt types and sizes, including fabric and rubber belts.
- Temporary or Permanent: Can be used for both temporary and permanent repairs, depending on the operational requirements.
- Disadvantages:
- Potential for Belt Damage: Over time, mechanical fasteners can cause additional wear and tear on the belt, especially if not installed correctly.
- Reduced Belt Flexibility: The presence of fasteners can reduce the belt’s flexibility, potentially affecting its performance in certain applications.
- Maintenance: Mechanical fasteners may require periodic maintenance and tightening to ensure they remain secure.
Vulcanization
Vulcanization involves using heat or chemical processes to bond repair materials to the conveyor belt, creating a seamless and durable repair. This method is often used for more extensive or critical repairs.
- Advantages:
- Strong Bond: Vulcanized repairs create a strong, permanent bond that can withstand high loads and harsh conditions.
- Seamless Repair: The repair material integrates seamlessly with the belt, maintaining its flexibility and performance.
- Longevity: Vulcanized repairs are typically more durable and longer-lasting than mechanical fasteners.
- Disadvantages:
- Time-Consuming: The vulcanization process can be time-consuming, requiring significant downtime.
- Specialized Equipment: Requires specialized equipment and trained technicians, making it less accessible for in-house maintenance teams.
- Higher Cost: The initial cost of vulcanization is higher due to the equipment and expertise required.
Knowing how to repair conveyor belt rips effectively is essential for maintaining efficient and uninterrupted operations. Using a rip repair kit with adhesives and mechanical fasteners is a practical approach for quick and reliable repairs. However, for more extensive or critical repairs, vulcanization offers a stronger and more durable solution. Each method has its advantages and is suited for different situations. By understanding the techniques and selecting the appropriate repair method, you can ensure your conveyor belts remain in optimal condition, minimizing downtime and maximizing productivity.
How to Repair Conveyor Belt: Conveyor Belt Replacement Procedures
Conveyor belts are essential components in many industrial operations, but there comes a time when repair is no longer feasible, and replacement becomes necessary. Knowing how to repair conveyor belt issues is crucial, but understanding when and how to replace a conveyor belt is equally important to ensure the efficiency and safety of your operations. This section provides detailed guidelines on when to consider replacing a conveyor belt and a step-by-step process for conveyor belt replacement.
When to Consider Replacing Instead of Repairing a Conveyor Belt
Determining whether to repair or replace a conveyor belt depends on several factors, including the extent of the damage, the age of the belt, and the operational requirements. Here are some scenarios where replacement is the better option:
Extensive Damage
- When the conveyor belt has multiple tears, large rips, or significant wear over a large area, repairing it may not be cost-effective or reliable. Extensive damage can compromise the belt’s structural integrity and performance.efficiency.
Frequent Repairs
- If the conveyor belt requires frequent repairs, it indicates that the belt has reached the end of its useful life. Continuous patching and fixing can lead to increased downtime and maintenance costs.
Aging Belt
- Conveyor belts have a finite lifespan. As belts age, they become more prone to failures and less effective in handling loads. An old belt that shows signs of aging, such as cracking or hardening, should be replaced.
Changes in Operational Requirements
- If there are changes in the operational requirements, such as increased load capacity, speed, or different material handling, the existing belt may no longer be suitable. Upgrading to a new belt that meets the new requirements is necessary.
Safety Concerns
- Safety is paramount in any operation. If the condition of the conveyor belt poses a safety risk, such as increased chances of belt breakage or accidents, replacement is necessary to ensure a safe working environment.
Step-by-Step Process on Conveyor Belt Replacement Procedure
Replacing a conveyor belt involves several critical steps to ensure the new belt is installed correctly and operates smoothly.
Prepare for Replacement
- Plan the replacement process during a scheduled downtime to minimize operational disruptions. Ensure all necessary tools, equipment, and the new conveyor belt are ready.
Ensure Safety
- Shut down the conveyor system and lock out/tag out (LOTO) to prevent accidental startup. Ensure all personnel involved in the replacement process are wearing appropriate personal protective equipment (PPE).
Remove the Old Belt
- Loosen the tension on the conveyor belt by adjusting the tensioning mechanism. Carefully remove the old belt from the conveyor system. If the belt is still in one piece, use a belt puller or similar tool to assist in removal.In a warehouse, use a belt puller to slide the old belt off the rollers and frame carefully.
Inspect and Clean the Conveyor System
- Before installing the new belt, inspect the conveyor system for any damage or wear on the rollers, pulleys, and frame. Clean the entire system to remove debris, dirt, and old adhesive residues.
Install the New Belt
- Position the new conveyor belt on the conveyor system. Align the belt properly with the rollers and pulleys to ensure it runs straight. Use a belt puller to help position the belt if necessary.
Adjust Tension and Track the Belt
- Adjust the tensioning mechanism to apply the correct tension to the new belt. Ensure the belt is not too tight or too loose. Run the conveyor at a low speed to check the belt tracking. Make necessary adjustments to the tracking to ensure the belt runs centrally.In a packaging facility, run the belt at low speed and adjust the tension and tracking to prevent the belt from drifting to one side.
Test the Conveyor System
- After the new belt is installed and adjusted, perform a thorough test run of the conveyor system. Check for any signs of misalignment, improper tension, or abnormal noise. Make any final adjustments as needed.
Perform Final Inspection and Documentation
- After testing, conduct a final inspection of the entire conveyor system. Ensure all components are functioning correctly and the new belt is properly installed. Document the replacement process, including any adjustments made and observations during the test run.
Understanding how to repair conveyor belt issues is vital, but knowing when to replace a belt and how to do it correctly is equally important. Replacing a conveyor belt is necessary when the belt is extensively damaged, requires frequent repairs, is aging, no longer meets operational requirements, or poses safety concerns. The replacement process involves preparing for the replacement, ensuring safety, removing the old belt, inspecting and cleaning the system, installing the new belt, adjusting tension and tracking, testing the system, and performing a final inspection. By following these steps, you can ensure a smooth and effective conveyor belt replacement, minimizing downtime and maintaining operational efficiency.
How to Repair Conveyor Belt: Utilizing Conveyor Belt Repair Clips
Conveyor belt repair clips are invaluable tools for quick and efficient fixes. Knowing how to repair conveyor belt issues using repair clips can save time and minimize downtime, making them essential for any maintenance toolkit. This section explains the function and benefits of using repair clips for quick fixes and provides a detailed demonstration on how to install them correctly.
Function and Benefits of Using Repair Clips for Quick Fixes
Conveyor belt repair clips are designed to provide a fast, effective, and temporary solution to minor belt damages, such as small tears and punctures. These clips can be used to hold the belt together and keep it operational until a more permanent repair can be made.
Function of Conveyor Belt Repair Clips:
- Temporary Fix: Repair clips are designed to temporarily hold together a damaged conveyor belt, preventing further damage and allowing the belt to continue operating until a permanent repair can be scheduled.
- Quick Installation: Clips can be installed quickly without the need for specialized tools or extensive downtime, making them ideal for emergency repairs.
- Versatility: Suitable for various types of belts, including rubber and fabric-reinforced belts, repair clips can handle different levels of stress and load.
- Minimal Downtime: By using repair clips, operations can resume swiftly, minimizing the impact of belt damage on production and overall efficiency.
Benefits of Using Conveyor Belt Repair Clips:
- Cost-Effective: Repair clips are a cost-effective solution for temporary repairs, avoiding the need for immediate and potentially expensive permanent fixes.
- Easy to Use: The installation process is straightforward and can be performed by in-house maintenance personnel, reducing the need for external repair services.
- Prevents Further Damage: By securing the damaged area, repair clips prevent the tear or puncture from expanding, protecting the belt from more severe damage.
- Operational Continuity: With quick installation, repair clips ensure that conveyor systems can continue to function with minimal disruption, maintaining productivity.
- Flexibility: Repair clips can be used in various environments and industries, making them a versatile tool for different conveyor belt applications.
Demonstration on How to Install Conveyor Belt Repair Clips Correctly
Installing conveyor belt repair clips correctly is crucial for ensuring the temporary fix holds effectively until a permanent repair can be made. Here’s a step-by-step guide on how to repair conveyor belt issues using repair clips:
Safety First
- Ensure the conveyor system is completely shut down and locked out/tagged out (LOTO) to prevent accidental startup. Wear appropriate personal protective equipment (PPE) such as gloves, safety glasses, and a hard hat.
Identify and Assess the Damage
- Inspect the conveyor belt to locate the damaged area that needs repair. Measure the extent of the tear or puncture to determine the number of repair clips required.
Clean the Damaged Area
- Thoroughly clean the area around the damage to remove any dirt, debris, or residue. Use a wire brush or scraper to ensure a clean surface, which will help the clips adhere more effectively.
Position the Clips
- Place the repair clips along the edges of the tear or puncture, ensuring they are evenly spaced. The clips should span the length of the damage, providing comprehensive coverage to hold the belt together.
- Example: For a 6-inch tear, use enough clips to cover the entire tear with a clip every 1-2 inches, ensuring even distribution and secure holding.
Install the Clips
- Insert the teeth of the clips into the belt material, ensuring they penetrate deeply enough to hold securely. Use pliers or a specific clip installation tool to press the clips firmly into place.
- Example: Using pliers, press each clip firmly into the belt material, making sure the teeth grip both sides of the tear.
Secure the Clips
- Tighten the clips to secure them in place. This may involve tightening screws or bolts, depending on the type of repair clips used. Ensure all clips are firmly tightened and the belt edges are drawn together.Tighten the screws on each clip using a screwdriver, ensuring that the clip holds the belt edges tightly together without any gaps.
Inspect the Repair
- Once all the clips are installed and secured, inspect the repair to ensure the clips are holding the belt together effectively. Check for any gaps or areas where the clips might be loose.Perform a visual inspection and manually check each clip to ensure it is tightly secured and holding the belt together properly.
Test the Conveyor System
- After ensuring the repair is secure, perform a test run of the conveyor belt at a low speed to check the integrity of the repair. Observe the belt to ensure the clips are holding and there are no issues with the repair.Run the conveyor belt at a slow speed, monitoring the repaired area for any signs of slippage or further damage.
Monitor the Repair
- Continue to monitor the repaired area during regular operation to ensure the clips remain secure. Plan for a permanent repair as soon as possible to replace the temporary fix.Schedule a permanent repair during the next maintenance downtime and regularly check the clips to ensure they are still holding the belt together effectively.
Understanding how to repair conveyor belt issues with repair clips is a valuable skill that can minimize downtime and maintain operational efficiency. Repair clips provide a quick, temporary fix for minor damages, allowing the conveyor system to continue running until a permanent repair can be scheduled. The benefits of using repair clips include cost-effectiveness, ease of use, prevention of further damage, operational continuity, and flexibility. By following the step-by-step guide on installing conveyor belt repair clips correctly, you can ensure a secure and effective temporary repair, maintaining productivity and minimizing disruptions.
How to Repair Conveyor Belt: Advanced Repair Solutions
In the world of industrial maintenance, understanding how to repair conveyor belt issues efficiently is crucial for minimizing downtime and maintaining operational efficiency. Advanced repair solutions, such as those provided by Belzona, offer robust and durable methods for addressing conveyor belt damage. This section introduces Belzona products and explains how they provide comprehensive solutions for conveyor belt repairs, followed by an example of a repair scenario using Belzona products.
Belzona Products and How They Provide a Robust Solution
Belzona is renowned for its high-performance repair composites and coatings designed for industrial maintenance. Belzona products are specifically formulated to provide durable and long-lasting repairs for various types of conveyor belt damage, including tears, gouges, and abrasion. The advanced polymer technology used in Belzona products ensures that repairs can withstand the harshest operating conditions, extending the service life of conveyor belts.
Key Features of Belzona Products:
- High Adhesion: Belzona repair materials are designed to bond strongly with conveyor belt surfaces, ensuring a reliable and durable repair that can handle high stress and load conditions.
- Flexibility: The flexibility of Belzona polymers allows them to move with the conveyor belt, preventing the repaired area from becoming a point of weakness.
- Abrasion Resistance: Belzona products are highly resistant to abrasion, making them ideal for repairing belts that handle abrasive materials like minerals, ores, and aggregates.
- Chemical Resistance: The chemical-resistant properties of Belzona materials make them suitable for environments where belts are exposed to harsh chemicals.
- Ease of Application: Belzona repair kits are designed for ease of use, allowing for quick and effective on-site repairs with minimal downtime.
Applications of Belzona Products:
- Tear Repair: Belzona products can effectively repair tears and rips in conveyor belts, restoring their integrity and preventing further damage.
- Abrasive Wear Repair: Belzona’s abrasion-resistant materials are perfect for repairing belts that experience significant wear and tear from abrasive materials.
- Edge Repair: Belzona can reinforce and repair worn or damaged edges, extending the belt’s operational life.
- Joint Repair: Belzona products can be used to repair or reinforce joints and splices in conveyor belts, ensuring seamless and strong connections.
Example of a Repair Scenario Using Belzona Products
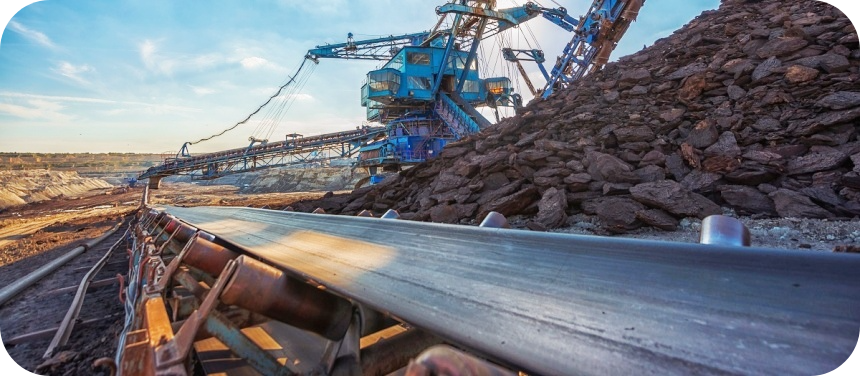
To illustrate the effectiveness of Belzona products in conveyor belt repair, consider the following example of a repair scenario in a mining operation:
Scenario:
A mining company’s conveyor belt, used to transport large volumes of ore, has developed several deep gouges and tears due to the abrasive nature of the material. The damage is severe enough to cause frequent stoppages, leading to costly downtime.
Repair Solution Using Belzona Products:
Assessment and Preparation:
- The maintenance team inspects the conveyor belt to assess the extent of the damage. They identify multiple gouges and tears, each several inches long.
- The conveyor system is shut down, and safety measures, including lockout/tagout (LOTO), are implemented to ensure a safe working environment.
Surface Preparation:
- The damaged areas are cleaned thoroughly to remove any dirt, debris, and loose particles. A wire brush is used to roughen the surface, enhancing the adhesion of the Belzona materials.
- The team uses a degreaser to ensure the area is free from oils and contaminants, ensuring optimal bonding.
Application of Belzona 2311 (SR Elastomer):
- Belzona 2311, a high-performance elastomer, is chosen for its excellent adhesion and flexibility. This product is ideal for repairing rubber components subject to wear and tear.
- The Belzona 2311 material is mixed according to the manufacturer’s instructions, ensuring a consistent and effective repair compound.
Applying the Repair Material:
- The mixed Belzona 2311 is applied to the gouged and torn areas using a spatula, ensuring the material penetrates the damage and bonds well with the belt surface.
- The material is smoothed over the damage, filling the gouges and covering the tears completely. The repair area is feathered out to blend seamlessly with the surrounding belt surface.
Curing Process:
- The repair is left to cure as per the product’s specifications. Belzona 2311 typically cures quickly, allowing the belt to return to service within a few hours.
- During the curing process, the team ensures that the area remains undisturbed to achieve maximum adhesion and effectiveness.
Inspection and Testing:
- After curing, the repair is inspected to ensure it has bonded correctly and the surface is smooth and even.
- The conveyor belt is restarted, and a test run is conducted to verify the integrity of the repair under operational conditions. The repaired areas show no signs of weakness or further damage, confirming the success of the repair.
Outcome:
The use of Belzona 2311 has restored the conveyor belt’s integrity, preventing further damage and significantly reducing downtime. The mining operation can continue efficiently, with the belt now capable of handling the abrasive ore without issues.
Knowing how to repair conveyor belt damage effectively is crucial for maintaining operational efficiency in industrial settings. Advanced repair solutions like Belzona products offer robust and durable methods for addressing various types of conveyor belt damage. Belzona’s high-performance materials provide excellent adhesion, flexibility, abrasion resistance, and chemical resistance, making them ideal for severe environments. The detailed example of a mining operation repair scenario demonstrates the practical application and effectiveness of Belzona products in real-world situations. By utilizing advanced repair solutions, businesses can ensure their conveyor belts remain operational and efficient, minimizing downtime and maximizing productivity.
How to Repair Conveyor Belt: Estimating Conveyor Belt Replacement Costs
Understanding how to repair conveyor belt issues is crucial, but there comes a time when replacing the belt is the best option to maintain efficiency and safety. Estimating the cost of conveyor belt replacement involves considering various factors that can significantly impact the total expenditure. This section discusses the key factors that influence conveyor belt replacement costs and provides guidelines for budgeting.
Factors that Influence the Cost of Conveyor Belt Replacement
Several factors contribute to the overall cost of replacing a conveyor belt. Understanding these factors can help you make informed decisions and prepare a more accurate budget.
Belt Material and Type
- The material and type of the conveyor belt play a significant role in determining the replacement cost. Different materials offer varying levels of durability, flexibility, and resistance to abrasion and chemicals.
Belt Length and Width
- The dimensions of the conveyor belt, including its length and width, directly affect the cost. Larger belts require more material, increasing the overall expense.
Belt Strength and Specifications
- Conveyor belts come in different strength ratings, usually measured in pounds per inch of width (PIW) or Newtons per millimeter (N/mm). Higher strength belts designed for heavy-duty applications will cost more.
Labor Costs
- The cost of labor for removing the old belt and installing the new one can vary based on the complexity of the job and the location. Highly skilled technicians and difficult installations will increase labor costs.
Additional Components and Services
- Replacement often involves more than just the belt itself. Costs can include new pulleys, rollers, and fasteners, as well as services like alignment and tensioning.
Guideline for Budgeting for a Conveyor Belt Replacement
To effectively budget for a conveyor belt replacement, consider the following steps:
Assess the Condition of the Current Belt
- Conduct a thorough inspection of the existing conveyor belt to determine its condition and the extent of wear and damage. This assessment will help you decide whether replacement is necessary and what specifications the new belt should meet.
Determine the Required Specifications
- Based on the assessment, determine the appropriate specifications for the replacement belt, including material, length, width, and strength. Ensure the new belt meets the operational requirements and is suitable for the specific application.
Get Multiple Quotes
- Obtain quotes from several reputable suppliers and contractors. Comparing quotes will give you a better understanding of the market rates and help you find the best deal. Ensure the quotes include all necessary components and services.
Include Labor Costs
- Factor in the labor costs for removing the old belt and installing the new one. Consider the complexity of the installation and the expertise required. It’s often beneficial to hire experienced professionals to ensure the job is done correctly and efficiently.
Plan for Downtime
- Account for the cost of downtime during the belt replacement process. Plan the replacement during scheduled maintenance periods or times of low production to minimize the impact on operations.
Budget for Contingencies
- Set aside a contingency budget for unexpected expenses. Issues such as additional repairs needed to the conveyor system, unforeseen complications during installation, or delays can increase the total cost.
Review and Approve the Budget
- Review the detailed budget with all stakeholders, including management, maintenance teams, and financial officers. Ensure everyone agrees on the projected costs and the timeline for the replacement.
Example Budget Breakdown:
- Conveyor Belt Cost: $10,000
- Material: High-temperature resistant rubber
- Length: 200 feet
- Width: 36 inches
- Strength: 600 PIW
- Labor Costs: $4,000
- Removal of old belt: $1,500
- Installation of new belt: $2,500
- Additional Components: $2,000
- New pulleys and rollers: $1,500
- Fasteners and alignment tools: $500
- Downtime Costs: $1,500
- Lost production: $1,500 (5 hours at $300/hour)
- Contingency Budget: $1,000
- Total Estimated Cost: $18,500
Knowing how to repair conveyor belt issues is essential, but understanding when and how to replace a conveyor belt is equally important for maintaining efficient and safe operations. Several factors influence the cost of conveyor belt replacement, including the belt material and type, dimensions, strength specifications, labor costs, and additional components. By assessing the condition of the current belt, determining the required specifications, obtaining multiple quotes, including labor costs, planning for downtime, and budgeting for contingencies, you can create a comprehensive budget for conveyor belt replacement. This approach ensures you are prepared for the financial impact and can execute the replacement smoothly, minimizing disruptions and maintaining productivity.
Get in touch to explore our conveyor belt options and receive a personalized quote.
FAQs About How to Repair Conveyor Belt
Fixing a broken conveyor belt involves identifying the damage and using appropriate repair techniques to restore its functionality. First, ensure the conveyor system is shut down and locked out to prevent accidents. Clean the damaged area to remove debris and contaminants. For minor damage like small tears or punctures, use a conveyor belt repair kit that includes adhesive and patches. Apply the adhesive to the damaged area and cover it with a patch, pressing firmly to ensure a secure bond. For more significant damage, consider using mechanical fasteners or performing a vulcanized repair. Mechanical fasteners involve using metal clips to join the damaged sections, while vulcanization uses heat or chemicals to create a seamless bond. It’s crucial to follow manufacturer instructions for any repair method to ensure a durable fix. Regular maintenance and inspections can help prevent future breaks and prolong the belt’s lifespan.
Splicing a conveyor belt involves joining two ends to create a continuous loop. The most common methods are mechanical splicing and vulcanized splicing. Mechanical splicing uses metal fasteners to join the belt ends. Begin by cutting the belt ends square, then insert the fasteners into the belt and secure them using a splicing tool. This method is quick and doesn’t require specialized equipment, making it suitable for temporary or emergency repairs. Vulcanized splicing, on the other hand, creates a stronger and more durable joint. This process involves preparing the belt ends by stripping back the cover to expose the carcass, applying a vulcanizing compound, and using a vulcanizing press to bond the ends under heat and pressure. This method provides a seamless splice, which is ideal for high-tension and critical applications. Regardless of the method, it’s essential to follow detailed instructions and safety protocols to ensure a successful splice.
The best glue for conveyor belt repairs depends on the belt material and the type of damage. Urethane-based adhesives are highly recommended for their strong bonding properties and flexibility, making them suitable for most rubber conveyor belts. For high-temperature environments, silicone-based adhesives are ideal due to their heat resistance. Epoxy adhesives provide excellent durability and are suitable for both rubber and fabric-reinforced belts, handling high loads and harsh conditions effectively. Rubber cement is another option for minor repairs, offering a flexible and quick bond. For more permanent and seamless repairs, cold vulcanizing adhesives are preferred. These create a chemical bond similar to hot vulcanization but without the need for heat, making them convenient for on-site repairs. Always ensure the adhesive is compatible with your specific belt material and follow the manufacturer’s instructions for the best results.
Joining the ends of a conveyor belt is essential for creating a continuous loop. The two primary methods are mechanical fastening and vulcanization. Mechanical fastening involves using metal fasteners or clips to join the belt ends. Start by cutting the ends square, then insert the fasteners and secure them using a splicing tool. This method is quick and doesn’t require specialized equipment, making it ideal for temporary or emergency fixes. Vulcanization, either hot or cold, provides a more permanent and durable solution. Hot vulcanization involves applying heat and pressure to bond the belt ends using a vulcanizing press. Cold vulcanization uses a chemical adhesive to create a strong bond without heat. Both methods require preparing the belt ends by stripping back the cover and applying bonding agents. The choice of method depends on the belt material, the operational environment, and the required strength of the joint. Proper preparation and adherence to safety protocols are crucial for a successful join.
Repairing a ripped conveyor belt involves several steps to ensure a durable and effective fix. Here’s a step-by-step guide:
Assess the Damage: Identify the extent and location of the rip. Determine whether the damage is minor (punctures, small tears) or major (large rips, significant structural damage).
Terminate the Tear: Drill holes at each end of the tear to prevent further spreading. This step helps to contain the damage.
Prepare the Area: Clean the damaged section thoroughly to remove any debris or contaminants. For significant tears, undercut the rubber around the tear and remove the top layer to create a clean surface for repair.
Apply Repair Material: For minor punctures, use a standard bolt solid plate fastener crosswise over the damaged area. For larger rips, consider using a hot air welding repair method, especially for mono-material belts. This involves welding a patch over the rip to restore the belt’s integrity.
Secure the Repair: Ensure the patch or fastener is securely attached and check for any gaps or loose areas. This step is crucial to prevent the repair from failing under load.
Test the Belt: Run the conveyor at a low speed to check the repair. Inspect for any signs of weakness or further damage before returning to full operation.
Yes, a conveyor belt can be repaired, depending on the type and extent of the damage. Minor damages such as small punctures, tears, or worn spots can often be repaired on-site using various methods like:
Bolt Solid Plate Fasteners: Effective for small punctures and tears, these fasteners are applied crosswise over the damaged area.
Hot Air Welding: Ideal for mono-material belts, this method involves welding a patch over the damaged section.
Cold Curing: For rubber belts, applying a cold curing compound can patch minor wear and tears.
For more extensive damage, professional services might be required to ensure the belt is restored to optimal working condition. Regular maintenance and prompt repairs can extend the lifespan of the belt and improve operational efficiency.
Troubleshooting a conveyor belt involves systematic checks and procedures to identify and resolve issues. Here are the steps:
Visual Inspection: Check for obvious signs of damage, such as tears, misalignment, or worn spots.
Belt Tracking: Ensure the belt is running straight and centered. Misalignment can cause uneven wear and operational issues.
Tension Check: Verify that the belt tension is correct. Over-tensioned belts can lead to excessive wear, while under-tensioned belts can slip and reduce efficiency.
Pulley and Roller Inspection: Examine pulleys and rollers for signs of wear or damage. Ensure they are properly aligned and rotating smoothly.
Drive System Check: Inspect the drive motor, gearbox, and couplings for proper operation. Look for signs of wear or damage that could affect performance.
Noise and Vibration Monitoring: Listen for unusual noises or vibrations, which can indicate problems with the belt or drive components.
By systematically checking these areas, you can identify and resolve issues, ensuring the conveyor belt operates efficiently.
Regular maintenance is essential to keep a conveyor belt running smoothly and to extend its lifespan. Here are the key steps:
Routine Inspection: Conduct regular visual inspections to check for signs of wear, damage, or misalignment. Pay special attention to the belt surface, pulleys, rollers, and drive system.
Cleaning: Keep the belt and surrounding area clean. Remove any debris, dirt, or material buildup that could interfere with belt operation.
Lubrication: Lubricate bearings, pulleys, and other moving parts according to the manufacturer’s recommendations to ensure smooth operation and reduce wear.
Belt Tension: Regularly check and adjust the belt tension. Proper tension ensures efficient operation and prevents slippage or excessive wear.
Alignment: Ensure the belt is properly aligned. Misalignment can cause uneven wear and lead to belt failure. Adjust pulleys and rollers as needed to maintain alignment.
Component Replacement: Replace worn or damaged components, such as rollers, pulleys, and fasteners, promptly to prevent further damage and maintain operational efficiency.
Regular maintenance helps prevent unexpected downtime, extends the life of the conveyor belt, and ensures safe and efficient operation.
Last Updated on August 1, 2024 by Jordan Smith
Jordan Smith, a seasoned professional with over 20 years of experience in the conveyor system industry. Jordan’s expertise lies in providing comprehensive solutions for conveyor rollers, belts, and accessories, catering to a wide range of industrial needs. From initial design and configuration to installation and meticulous troubleshooting, Jordan is adept at handling all aspects of conveyor system management. Whether you’re looking to upgrade your production line with efficient conveyor belts, require custom conveyor rollers for specific operations, or need expert advice on selecting the right conveyor accessories for your facility, Jordan is your reliable consultant. For any inquiries or assistance with conveyor system optimization, Jordan is available to share his wealth of knowledge and experience. Feel free to reach out at any time for professional guidance on all matters related to conveyor rollers, belts, and accessories.

