How to Repair Torn Conveyor Belt: Effective Repair
A torn conveyor belt can have a significant impact on operations, causing delays, reducing productivity, and increasing costs. Understanding how to repair torn conveyor belt is crucial for maintaining smooth and efficient workflows. A damaged conveyor belt can lead to unexpected shutdowns, affecting the entire production line. Therefore, timely and effective repair is essential to prevent extended downtime and ensure that operations continue without interruption. How to repair torn conveyor belt,For tears, drill to terminate, undercut and remove rubber, abrade, clean, tape, and apply adhesive . Trim frays and handle rips as needed.By learning how to repair torn conveyor belt properly, businesses can minimize disruptions, enhance the longevity of their equipment, and maintain optimal performance. This guide will provide comprehensive steps and best practices on how to repair torn conveyor belt effectively and efficiently.
How to Repair Torn Conveyor Belt: Identifying Conveyor Belt Damage
Identifying conveyor belt damage is the crucial first step in understanding how to repair torn conveyor belt effectively. Recognizing the type and extent of the damage will guide you in selecting the most appropriate repair method, ensuring the longevity and reliability of the belt.
Assessing Conveyor Belt Damage
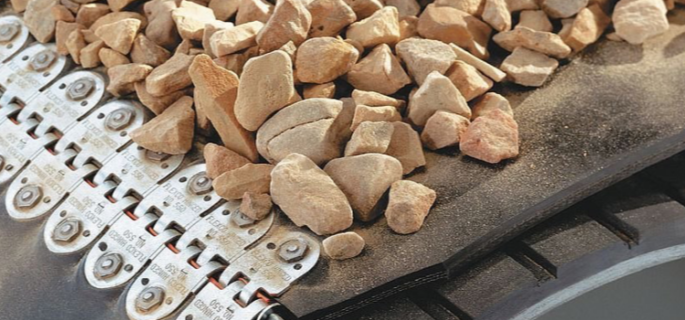
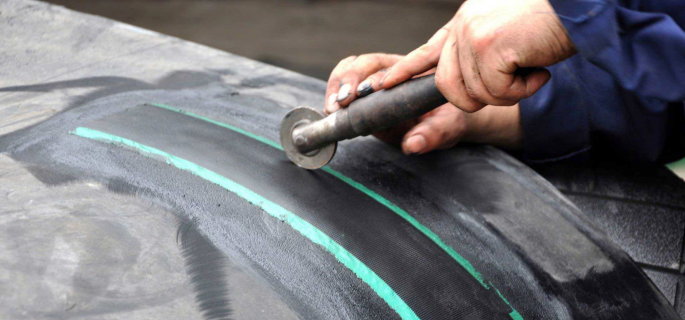
The first step in repairing a torn conveyor belt is to conduct a thorough assessment of the damage. This involves a detailed inspection to determine the type of tear, its size, and its location. By accurately identifying the damage, you can avoid unnecessary repairs and choose the most effective solution. Here are five examples of common conveyor belt damages and their respective repair approaches.
1. Small Surface Cuts
Small surface cuts are minor damages that typically do not extend through the entire thickness of the belt. These cuts may result from sharp objects falling on the belt or improper handling during maintenance. Although they seem insignificant, if left unaddressed, they can expand and cause more severe damage over time.
- Repair Approach: For small surface cuts, using a conveyor belt repair tape is often sufficient. The tape provides a quick and easy fix, reinforcing the damaged area and preventing the cut from spreading. It’s important to clean the area thoroughly before applying the tape to ensure a strong bond.
2. Longitudinal Tears
Longitudinal tears run along the length of the conveyor belt and can be caused by continuous overloading, sharp materials, or misalignment of the belt. These tears are more severe and can compromise the structural integrity of the belt if not addressed promptly.
- Repair Approach: Longitudinal tears require a more robust solution, such as using repair patches or clips. Repair patches are ideal for covering large areas, while clips can be used to hold the torn edges together, providing a temporary fix until a more permanent repair can be carried out.
3. Edge Damage
Edge damage occurs when the edges of the conveyor belt become frayed or worn. This type of damage is often caused by belt misalignment or excessive wear from running against the conveyor structure.
- Repair Approach: Edge damage can be addressed by trimming the frayed edges and applying edge repair strips. These strips reinforce the edges, preventing further fraying and extending the belt’s lifespan. Regular maintenance and alignment checks can help prevent this type of damage from recurring.
4. Holes and Punctures
Holes and punctures can result from sharp objects penetrating the belt or from heavy impact. These damages can lead to material spillage and reduced efficiency in material handling.
- Repair Approach: For holes and punctures, using a combination of repair patches and conveyor belt repair glue is effective. The patch covers the hole, while the glue ensures a secure and durable bond. It’s crucial to clean and dry the damaged area before applying the repair materials to achieve the best results.
5. Belt Delamination
Belt delamination occurs when the layers of the conveyor belt start to separate. This can happen due to prolonged exposure to moisture, extreme temperatures, or chemical exposure. Delamination can severely weaken the belt, leading to complete failure if not repaired.
- Repair Approach: Addressing delamination involves using repair glue specifically designed for conveyor belts. The glue is applied between the delaminated layers to bond them back together. Clamping the belt during the curing process ensures a tight and secure bond.
Importance of a Full Assessment
Conducting a full assessment of the conveyor belt damage is critical in choosing the right repair method. A comprehensive evaluation involves not only identifying visible damage but also understanding the underlying causes. This can include examining the belt’s operating environment, the materials being transported, and the overall condition of the conveyor system.
- Benefits of a Full Assessment:
- Prevent Recurrence: By understanding the root causes of the damage, you can implement measures to prevent future occurrences. This might involve adjusting the belt tension, improving material handling procedures, or upgrading the conveyor system components.
- Cost-Effective Repairs: A thorough assessment helps in selecting the most appropriate and cost-effective repair method. This ensures that you are not overspending on unnecessary repairs and that the chosen method will provide a long-lasting solution.
- Enhanced Safety: Identifying and repairing conveyor belt damage promptly enhances the safety of the conveyor system. This reduces the risk of accidents and injuries caused by belt failures.
- Increased Efficiency: Effective repairs restore the conveyor belt to optimal condition, improving the efficiency and productivity of your operations.
Knowing how to repair torn conveyor belt begins with accurately identifying the type and extent of the damage. Whether dealing with small surface cuts or severe delamination, understanding the specific repair needs of your conveyor belt is essential for effective and long-lasting repairs. By conducting a full assessment and choosing the right repair method, you can ensure the continued efficiency and safety of your conveyor system.
The Reason Torn Conveyor Belt
When a conveyor belt tears, it can cause significant disruptions in operations and potentially lead to costly repairs or replacements. There are several common reasons for a torn conveyor belt, including:
Material Loading Issues
- Impact Damage: Heavy or sharp materials falling onto the belt from a height can cause punctures or tears.
- Uneven Loading: Incorrect loading can create uneven stress and lead to belt damage.
Maintenance and Wear
- Lack of Maintenance: Failure to regularly maintain and inspect the belt can result in wear and tear going unnoticed until it leads to a tear.
- Worn Components: Worn-out pulleys, rollers, or idlers can cause uneven wear and lead to tears.
Misalignment
- Belt Misalignment: If the belt is not properly aligned, it can rub against the conveyor structure or other components, causing fraying and eventually tearing.
- Roller Misalignment: Misaligned rollers can create uneven pressure and cause the belt to drift, leading to damage.
Belt Tension
- Over-tensioning: Excessive tension can cause the belt to stretch beyond its limits and tear.
- Under-tensioning: Insufficient tension can result in the belt slipping and being damaged by friction.
Environmental Factors
- Extreme Temperatures: Very high or low temperatures can affect the belt material, making it brittle and more prone to tearing.
- Chemical Exposure: Exposure to certain chemicals can degrade the belt material, leading to weakness and tears.
Foreign Objects
- Debris on the Belt: Foreign objects caught in the belt can puncture or tear it.
- Entrapment: Small pieces of debris getting trapped in pulleys or rollers can create additional wear and lead to tears.
Quality of Belt Material
- Substandard Material: Using a belt made of low-quality materials can result in premature wear and tearing.
- Inappropriate Material: Choosing a belt material that is not suitable for the specific application can lead to damage.
How to Repair Torn Conveyor Belt: When to Use Conveyor Belt Repair Tape
Conveyor belt repair tape is an effective and convenient solution for quick fixes. Knowing how to repair torn conveyor belt using repair tape can save time and prevent further damage, ensuring minimal disruption to your operations. This section will address scenarios where repair tape is the best solution and provide a step-by-step guide on applying it correctly.
Scenarios Where Repair Tape Is the Best Solution
1. Minor Surface Cuts and Abrasions
Repair tape is ideal for minor surface cuts and abrasions that do not penetrate the full thickness of the conveyor belt. These small damages can occur due to sharp objects or minor impacts and, if left unattended, can worsen over time.
- Example: A conveyor belt with small nicks and scratches from handling sharp materials can be quickly patched with repair tape to prevent the damage from spreading.
2. Emergency Repairs
In emergency situations where immediate repair is necessary to avoid prolonged downtime, repair tape provides a quick and efficient solution. It allows operations to resume while a more permanent repair is planned.
- Example: If a belt tears during peak production hours, applying repair tape can quickly seal the tear, allowing production to continue with minimal interruption.
3. Temporary Fixes
Repair tape serves as an excellent temporary fix when waiting for more comprehensive repair materials or professional services. It holds the belt together and maintains its functionality until a permanent solution can be implemented.
- Example: When awaiting a scheduled visit from a repair technician, applying tape to a torn belt ensures the system remains operational.
4. Preventive Maintenance
Applying repair tape to areas showing early signs of wear can prevent tears from developing. This preventive measure extends the life of the conveyor belt and reduces the likelihood of unexpected failures.
- Example: Regular inspections reveal slight fraying on the belt edges, and applying repair tape can reinforce these areas, preventing further deterioration.
5. Non-Critical Applications
For conveyor belts used in non-critical applications where the speed and load are relatively low, repair tape can provide a lasting solution. In such scenarios, the demands on the belt are minimal, making the tape an effective repair method.
- Example: Belts used in low-speed, light-load applications like sorting or inspection lines can benefit from repair tape as a long-term solution.
Step-by-Step Guide on Applying Conveyor Belt Repair Tape
To effectively repair a torn conveyor belt using repair tape, follow these detailed steps:
Gather Materials and Prepare the Surface
- Materials Needed: Conveyor belt repair tape, cleaning solvent, a scraper or brush, scissors, and a roller.
- Preparation: Ensure the area to be repaired is clean and dry. Use a cleaning solvent to remove any dirt, grease, or debris from the surface. A clean surface ensures better adhesion of the tape.
Measure and Cut the Repair Tape
- Measurement: Measure the length and width of the damaged area. Cut a piece of repair tape that is slightly larger than the damaged area to provide full coverage and reinforcement.
- Cutting: Use scissors to cut the tape to the desired size. Ensure the edges of the tape are smooth and even to prevent peeling.
Apply the Repair Tape
- Positioning: Carefully position the cut piece of tape over the damaged area. Ensure it is centered and covers the entire tear or abrasion.
- Application: Press the tape onto the belt surface firmly, starting from the center and working outward. This helps to eliminate air bubbles and ensures good contact with the belt surface.
Secure the Tape with a Roller
- Rolling: Use a roller to press the tape firmly onto the belt. Roll over the tape several times with firm pressure to ensure it adheres well and creates a strong bond.
- Edges: Pay special attention to the edges of the tape, ensuring they are well adhered to prevent peeling.
Inspect the Repair
- Inspection: After applying the tape, inspect the repair to ensure it is secure and there are no air bubbles or loose edges. If any bubbles or edges are found, press them down firmly with the roller.
- Test Run: Before resuming full operations, conduct a test run of the conveyor belt to ensure the repair holds under operational conditions.
Monitor the Repair
- Monitoring: Regularly inspect the repaired area to ensure the tape remains in place and continues to provide adequate reinforcement. Reapply tape if necessary to maintain the integrity of the repair.
Knowing how to repair torn conveyor belt using conveyor belt repair tape can be a valuable skill in maintaining efficient and uninterrupted operations. Repair tape is suitable for minor cuts, emergency repairs, temporary fixes, preventive maintenance, and non-critical applications. By following the step-by-step guide on applying the tape, you can ensure a quick and effective repair, extending the life of your conveyor belt and minimizing downtime.
How to Repair Torn Conveyor Belt: The Role of a Conveyor Belt Repair Kit
A conveyor belt repair kit is an essential tool for anyone involved in the maintenance and operation of conveyor systems. Understanding how to repair torn conveyor belt effectively often begins with having the right tools and materials at your disposal. This section will detail the typical components of a conveyor belt repair kit, their uses, and practical tips on keeping a repair kit accessible for emergency situations.
Typical Components of a Conveyor Belt Repair Kit and Their Uses
A well-equipped conveyor belt repair kit includes a variety of tools and materials designed to address different types of damage. Here are five key components commonly found in repair kits and their specific uses:
1. Repair Tape
Use: Repair tape is used for quick and temporary fixes to minor surface cuts and abrasions on the conveyor belt. It provides immediate reinforcement to prevent the damage from spreading until a more permanent solution can be applied.
- Example: When a conveyor belt develops small nicks or surface scratches, repair tape can be quickly applied to cover the damaged area and maintain the belt’s functionality.
2. Repair Patches
Use: Repair patches are designed to cover larger tears and holes in the conveyor belt. They provide a durable and lasting solution, particularly when the damage is too extensive for repair tape alone.
- Example: If the conveyor belt has a significant tear or puncture, a repair patch can be applied to cover the damaged area, restoring the belt’s integrity and preventing material spillage.
3. Repair Glue
Use: Repair glue is essential for bonding repair patches and tape to the conveyor belt surface. It ensures a strong and durable adhesion, making the repair more resilient to operational stresses.
- Example: When applying a repair patch, repair glue is used to secure the patch to the belt, ensuring that it stays in place even under heavy load and continuous use.
4. Clamps and Fasteners
Use: Clamps and fasteners are used to hold the belt together while the repair materials set and cure. They are particularly useful for ensuring that patches and glue form a tight bond with the belt.
- Example: After applying a repair patch and glue, clamps can be used to hold the patched area together, ensuring that the glue cures properly and the patch is securely attached.
5. Cleaning Solvent
Use: Cleaning solvent is used to prepare the surface of the conveyor belt before applying repair materials. It removes dirt, grease, and debris, ensuring a clean surface for optimal adhesion.
- Example: Before applying repair tape or a patch, the damaged area is cleaned with solvent to remove any contaminants that could interfere with the adhesion of the repair materials.
Practical Tips on Keeping a Repair Kit Accessible for Emergency Situations
Having a conveyor belt repair kit is only effective if it is readily accessible when needed. Here are five practical tips to ensure your repair kit is always available for emergency situations:
1. Strategic Placement
Tip: Store the repair kit in a central and easily accessible location within the facility. Ensure that it is known and reachable by all relevant personnel.
- Example: Place the repair kit in the maintenance workshop or near the main control room where it can be quickly accessed during an emergency.
2. Regular Inventory Checks
Tip: Conduct regular inventory checks to ensure the repair kit is fully stocked with all necessary components. Replace any used or expired items promptly.
- Example: Schedule monthly checks to inventory the repair kit, ensuring that all materials, such as repair tape, patches, and glue, are in good condition and quantities are sufficient.
3. Training and Familiarity
Tip: Train all maintenance and operational staff on the contents and use of the repair kit. Ensure they are familiar with the procedures for repairing a torn conveyor belt.
- Example: Conduct training sessions where staff can practice using the repair kit, applying patches, and using glue and clamps effectively.
4. Emergency Protocols
Tip: Develop and implement emergency repair protocols that include steps for quickly accessing and using the repair kit. Ensure these protocols are clearly communicated and understood by all relevant staff.
- Example: Create an emergency repair checklist that outlines the steps to take when a conveyor belt tear is detected, including accessing the repair kit and applying the appropriate materials.
5. Kit Redundancy
Tip: Maintain multiple repair kits in different locations within the facility to ensure one is always accessible, even if one area is inaccessible due to the emergency.
- Example: Store additional repair kits near high-risk areas such as loading docks, production lines, and material handling zones to ensure immediate access.
Knowing how to repair torn conveyor belt efficiently is greatly enhanced by having a well-equipped repair kit. Typical components such as repair tape, patches, glue, clamps, and cleaning solvents are essential for addressing various types of damage. By keeping the repair kit accessible through strategic placement, regular inventory checks, staff training, clear emergency protocols, and kit redundancy, you can ensure that your facility is prepared to handle any conveyor belt repair needs promptly and effectively.
How to Repair Torn Conveyor Belt: Applying Conveyor Belt Repair Patches
Applying conveyor belt repair patches is a crucial step in how to repair torn conveyor belt, especially when dealing with larger tears and more significant damage. This section will outline the techniques for covering larger tears with repair patches and discuss the importance of selecting the correct patch size, shape, and material.
Techniques for Covering Larger Tears with Repair Patches
Proper application of repair patches is essential to ensure a durable and effective repair. Here are detailed techniques to apply conveyor belt repair patches correctly:
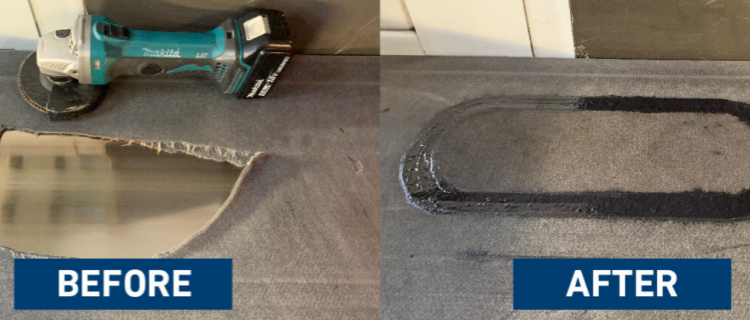
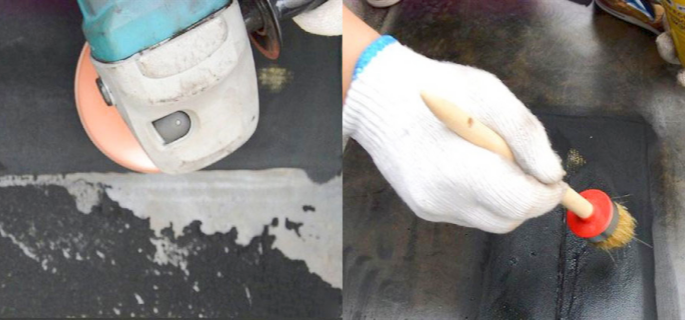
1. Cleaning the Damaged Area
Before applying a repair patch, it’s critical to clean the damaged area thoroughly. Dirt, grease, and other contaminants can prevent the patch from adhering properly to the belt surface.
- Technique: Use a cleaning solvent and a brush or scraper to remove all debris from the damaged area. Ensure the surface is dry before proceeding to the next step.
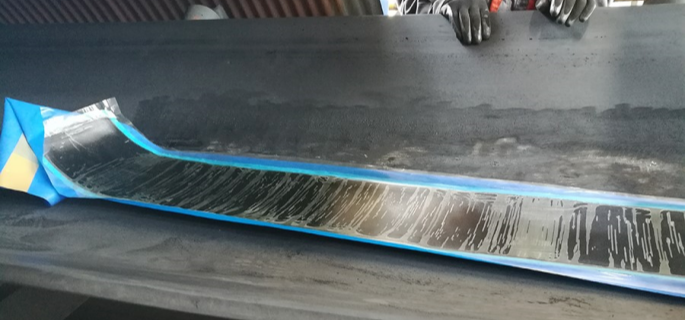
2. Measuring and Cutting the Patch
Accurate measurement and cutting of the repair patch are vital to ensure it covers the entire tear and provides sufficient overlap for a strong bond.
- Technique: Measure the length and width of the tear. Cut the repair patch so that it extends at least 2 inches beyond the tear on all sides. This extra material ensures the patch adheres securely to the undamaged sections of the belt.
3. Applying Adhesive
The adhesive is crucial for securing the patch to the belt. It must be applied evenly and in the right amount to ensure a strong bond.
- Technique: Apply a layer of conveyor belt repair glue to both the patch and the damaged area of the belt. Use a brush to spread the adhesive evenly, ensuring full coverage. Allow the adhesive to become tacky before positioning the patch.
4. Positioning and Securing the Patch
Proper positioning and securing of the patch are essential to ensure it adheres correctly and covers the entire damaged area.
- Technique: Carefully place the patch over the damaged area, ensuring it is centered and covers the tear completely. Press down firmly to secure the patch in place. Use a roller to apply even pressure across the patch, eliminating air bubbles and ensuring a strong bond.
5. Clamping and Curing
Clamping the patched area ensures the adhesive cures properly and the patch stays in place.
- Technique: Use clamps to hold the patch securely in place while the adhesive cures. Follow the manufacturer’s recommended curing time for the adhesive to achieve maximum strength.
Importance of Patch Size, Shape, and Material
Selecting the correct patch size, shape, and material is critical for a successful repair. The right patch can significantly enhance the durability and performance of the repaired belt. Here are five examples illustrating the importance of these factors:
Patch Size
Importance: The size of the repair patch must be appropriate for the size of the tear. A patch that is too small will not provide sufficient coverage, while an excessively large patch can be difficult to secure and may not adhere properly.
- Example: For a tear that is 4 inches long, a patch that is at least 8 inches long and 6 inches wide provides adequate coverage and reinforcement, ensuring the tear is completely covered and the patch is securely bonded to the undamaged areas.
Patch Shape
Importance: The shape of the patch should match the shape of the tear as closely as possible to ensure complete coverage and a strong bond. Irregularly shaped tears may require custom-shaped patches.
- Example: For a jagged tear, a patch that has been cut to match the contour of the tear will provide better coverage and a more secure bond than a standard rectangular patch.
Patch Material
Importance: The material of the repair patch must be compatible with the conveyor belt material and capable of withstanding the operational conditions, such as temperature, load, and chemical exposure.
- Example: A rubber conveyor belt used in a high-temperature environment requires a heat-resistant patch material to ensure the repair lasts under these conditions.
Adhesive Compatibility
Importance: The adhesive used must be compatible with both the belt and the patch material to ensure a strong and durable bond.
- Example: Using a polyurethane-based adhesive for a rubber belt and patch ensures a strong bond that can withstand the operational stresses of the conveyor system.
Patch Thickness
Importance: The thickness of the patch should be similar to that of the conveyor belt to maintain the belt’s performance and avoid creating weak points.
- Example: For a belt that is 1/2 inch thick, using a patch of similar thickness ensures the repair does not create a dip or hump, maintaining the belt’s smooth operation.
Knowing how to repair torn conveyor belt with repair patches involves understanding the techniques for applying patches and the importance of selecting the correct size, shape, and material. Proper cleaning, measurement, adhesive application, positioning, and curing are essential steps in the repair process. Choosing the right patch size, shape, and material ensures a durable and effective repair, maintaining the integrity and performance of your conveyor belt. By following these detailed guidelines, you can ensure that your conveyor belt repairs are successful and long-lasting.
How to Repair Torn Conveyor Belt: Utilizing Conveyor Belt Repair Clips
Conveyor belt repair clips offer a practical and efficient solution for repairing torn conveyor belts, particularly when a quick, durable fix is required. Understanding how to repair torn conveyor belt using repair clips can significantly reduce downtime and ensure the continued smooth operation of your conveyor system. This section will explain how repair clips work, when they are ideal to use, and provide instructions on the correct installation of conveyor belt repair clips.
How Repair Clips Work and When They Are Ideal to Use
Repair clips are designed to provide a mechanical fastening method for repairing torn conveyor belts. They work by clamping the torn edges of the belt together, creating a secure and robust join that can withstand the stresses of regular operation.
How Repair Clips Work
Mechanical Fastening: Repair clips function as a mechanical fastener, holding the torn edges of the conveyor belt together. The clips are typically made of metal and are designed to penetrate the belt material, securing both sides of the tear.
Uniform Pressure: The clips apply uniform pressure across the torn area, ensuring a tight and secure bond. This pressure helps to prevent the tear from expanding and maintains the belt’s integrity during operation.
Ease of Installation: One of the significant advantages of repair clips is their ease of installation. Unlike adhesive-based repairs, clips do not require curing time, allowing the belt to be put back into service immediately after the repair.
When to Use Repair Clips
Repair clips are ideal for several specific scenarios, making them a versatile option for conveyor belt repairs:
1. Emergency Repairs
Quick Fix: Repair clips are perfect for emergency repairs when immediate action is needed to prevent prolonged downtime. They can be installed quickly, restoring the belt’s functionality in a matter of minutes.
- Example: If a conveyor belt tears during a critical production period, repair clips can be used to quickly rejoin the torn edges, allowing operations to continue with minimal interruption.
2. High-Stress Environments
Durability: In environments where the conveyor belt is subjected to high stress, such as heavy loads or abrasive materials, repair clips provide a durable solution that can withstand these conditions better than adhesive-based repairs.
- Example: In mining operations where belts transport heavy, abrasive materials, repair clips offer a robust solution that can endure the harsh conditions.
3. Temporary Fixes
Interim Solution: Repair clips are also suitable as a temporary fix until a more permanent repair can be implemented. They allow the belt to remain operational while waiting for professional repair services or the delivery of more permanent repair materials.
- Example: While waiting for a scheduled maintenance shutdown, repair clips can temporarily hold a torn belt together, ensuring continued operation.
4. Misalignment Repairs
Alignment: When a belt tear occurs due to misalignment, repair clips can be used to realign the belt edges, providing a straight and secure join that minimizes further damage.
- Example: A misaligned belt that has torn at the edges can be realigned and secured with repair clips, preventing the tear from worsening.
5. Outdoor Applications
Weather Resistance: Repair clips are particularly useful in outdoor applications where weather conditions might affect adhesive-based repairs. Clips provide a reliable solution that is not impacted by temperature or humidity.
- Example: In outdoor conveyor systems exposed to varying weather conditions, repair clips offer a stable and reliable repair method that is not compromised by the elements.
Instructions on the Correct Installation of Conveyor Belt Repair Clips
Proper installation of repair clips is essential to ensure a strong and lasting repair. Follow these steps for correct installation:
Gather Necessary Tools
Tools Needed: Repair clips, a screwdriver or wrench (depending on the clip type), a measuring tape, and safety equipment such as gloves and safety glasses.
Prepare the Belt
Preparation: Ensure the conveyor belt is stopped and locked out to prevent accidental movement during the repair. Clean the torn area to remove any debris or contaminants that could interfere with the installation.
Measure and Mark
Measurement: Measure the length of the tear and mark the positions where the repair clips will be installed. Clips should be spaced evenly along the tear, typically every few inches, to ensure uniform pressure and a secure hold.
Install the Clips
Positioning: Position the first clip at one end of the tear. Ensure the clip is aligned correctly with the belt edges.
Fastening: Use a screwdriver or wrench to fasten the clip, driving the screws or bolts through the belt material. Tighten securely to ensure the clip holds both sides of the tear together.
Repeat Along the Tear
Consistency: Continue installing clips along the length of the tear, ensuring they are evenly spaced and securely fastened. Each clip should provide uniform pressure to maintain the belt’s integrity.
Inspect the Repair
Inspection: Once all clips are installed, inspect the repair to ensure all clips are tight and the belt edges are securely joined. Check for any gaps or misalignment and adjust as necessary.
Test the Belt
Testing: Before resuming full operations, conduct a test run of the conveyor belt at a slow speed to ensure the repair holds under operational conditions. Monitor the belt for any signs of failure or misalignment.
Understanding how to repair torn conveyor belt using repair clips involves knowing when they are the ideal solution and following proper installation techniques. Repair clips provide a quick, durable fix for emergency repairs, high-stress environments, temporary fixes, misalignment issues, and outdoor applications. By following the correct installation steps—gathering tools, preparing the belt, measuring and marking, installing the clips, inspecting the repair, and testing the belt—you can ensure a strong and lasting repair that maintains the efficiency and safety of your conveyor system.
How to Repair Torn Conveyor Belt: Importance of Conveyor Belt Repair Glue
Conveyor belt repair glue is an essential component in the toolkit for anyone tasked with maintaining and repairing conveyor systems. Knowing how to repair torn conveyor belt using the appropriate glue can significantly extend the lifespan of the belt and ensure operational efficiency. This section provides an overview of the types of conveyor belt repair glue and their applications, along with detailed instructions on preparing the surface and applying the glue for a strong bond.
Overview of the Types of Conveyor Belt Repair Glue and Their Applications
1. Contact Adhesives
Characteristics: Contact adhesives are known for their quick-drying properties and strong initial tack. They are usually solvent-based and require application to both surfaces being bonded.
Applications: Ideal for quick fixes and minor repairs, contact adhesives are commonly used to attach patches to small tears and surface abrasions.
- Example: A small surface cut on a conveyor belt can be swiftly repaired using a contact adhesive, ensuring the patch adheres securely without a lengthy curing process.
2. Two-Part Epoxy Adhesives
Characteristics: Two-part epoxy adhesives consist of a resin and a hardener that must be mixed before application. They offer superior strength and durability, making them suitable for more extensive repairs.
Applications: Best used for repairing large tears, holes, and significant damage where a strong, lasting bond is essential.
- Example: A significant tear in a heavy-duty conveyor belt transporting abrasive materials can be repaired using a two-part epoxy adhesive to ensure a robust and durable fix.
3. Urethane Adhesives
Characteristics: Urethane adhesives are flexible and resistant to wear, chemicals, and temperature variations. They offer good bonding strength and flexibility, making them suitable for dynamic applications.
Applications: Ideal for belts that experience significant flexing and twisting, such as those used in mining or heavy industry.
- Example: In a mining operation where belts must flex and twist around pulleys, urethane adhesive provides a strong and flexible bond that withstands these movements.
4. Cyanoacrylate Adhesives (Super Glue)
Characteristics: Cyanoacrylate adhesives, commonly known as super glue, are fast-acting and form a strong bond quickly. They are suitable for small, precise repairs.
Applications: Used for quick fixes on minor damages where precision is required, and the repair area is small.
- Example: A minor cut or nick in a conveyor belt can be quickly fixed with cyanoacrylate adhesive, allowing the belt to return to service almost immediately.
5. Rubber Cement
Characteristics: Rubber cement is made of elastic polymers and provides a flexible bond that can stretch and flex with the belt.
Applications: Suitable for temporary repairs or applications where the belt experiences frequent flexing.
- Example: For a belt that must maintain flexibility, such as those in sorting facilities, rubber cement can provide a quick, temporary repair that keeps the belt operational.
Instructions on Preparing the Surface and Applying the Glue for a Strong Bond
Surface Preparation
Proper surface preparation is crucial to ensure a strong bond between the conveyor belt and the repair patch. Follow these steps to prepare the surface effectively:
Cleaning: Use a cleaning solvent to thoroughly clean the damaged area. Remove all dirt, grease, and debris to ensure a clean surface for the adhesive. A clean surface ensures maximum contact and adhesion.
- Example: A dirty or greasy belt surface can prevent the adhesive from bonding properly, leading to repair failure. Cleaning the area with a solvent ensures the best possible bond.
Drying: Ensure the cleaned area is completely dry before applying the adhesive. Moisture can interfere with the bonding process and weaken the adhesive’s effectiveness.
- Example: After cleaning with a solvent, allow the area to air dry or use a cloth to dry it completely, ensuring no moisture remains.
Sanding (if necessary): For particularly smooth or glazed surfaces, lightly sanding the area can help the adhesive bond better by creating a rougher surface.
- Example: Using fine-grit sandpaper, gently sand the area around the tear to create a better bonding surface for the adhesive.
Mixing the Adhesive (if applicable)
If using a two-part adhesive, follow the manufacturer’s instructions for mixing the resin and hardener. Ensure the components are thoroughly mixed to achieve the best bonding properties.
- Example: Mix the resin and hardener in a clean container, ensuring they are combined thoroughly to activate the adhesive’s bonding properties.
Applying the Adhesive
Application Method: Apply the adhesive to both the repair patch and the cleaned area of the conveyor belt. Use a brush or applicator to spread the adhesive evenly, ensuring full coverage.
- Example: For a repair patch, apply a generous layer of adhesive to both the patch and the damaged area of the belt, ensuring complete and even coverage.
Positioning the Patch: Carefully position the repair patch over the damaged area. Ensure it is centered and covers the entire tear or hole.
- Example: Place the patch over the tear, aligning it precisely to ensure full coverage and a strong bond.
Applying Pressure: Use a roller or clamp to apply even pressure across the patch. This helps to eliminate air bubbles and ensures the adhesive bonds effectively to both surfaces.
- Example: Roll over the patch with a hand roller, applying firm and even pressure to ensure the adhesive bonds without any air pockets.
Curing Time
Allow the adhesive to cure according to the manufacturer’s instructions. This may involve letting the adhesive set for several hours or even overnight to achieve maximum strength.
- Example: Follow the recommended curing time, whether it’s a few hours or overnight, to ensure the adhesive has fully bonded and achieved its maximum strength.
Inspection and Testing
Once the adhesive has cured, inspect the repair to ensure the patch is securely bonded and there are no gaps or loose edges. Conduct a test run of the conveyor belt at a slow speed to ensure the repair holds under operational conditions.
- Example: After curing, visually inspect the patch for any signs of weak adhesion. Run the conveyor belt slowly to test the strength of the repair before resuming full operations.
Knowing how to repair torn conveyor belt using conveyor belt repair glue involves understanding the types of adhesives available and their appropriate applications. Proper surface preparation, correct application of the adhesive, and allowing sufficient curing time are critical steps in ensuring a strong and durable repair. By following these detailed instructions, you can ensure that your conveyor belt repairs are effective, maintaining the efficiency and longevity of your conveyor system.
How to Repair Torn Conveyor Belt: Conveyor Belt Repair Near Me
Finding local repair services and suppliers is a critical step in understanding how to repair torn conveyor belt effectively. Utilizing nearby professionals not only ensures faster repair times but also offers several other significant advantages. Here, we will explore the benefits of finding local conveyor belt repair services and provide practical tips on how to locate these professionals.
Advantages of Finding Local Repair Services and Suppliers
1. Faster Response Times
Local repair services can respond to emergencies much quicker than those located far away. This prompt response is crucial in minimizing downtime and preventing further damage to the conveyor belt. For instance, if a conveyor belt tears during a critical production period, having a local repair service on hand can mean the difference between a brief interruption and a major operational setback.
- Example: A manufacturing plant experiencing a sudden belt tear can contact a local repair company that arrives within hours, ensuring that production resumes swiftly.
2. Cost-Effective Solutions
Local suppliers often have lower transportation costs and can provide parts and services at more competitive prices. This cost-effectiveness extends to the overall repair process, as reduced travel expenses and shorter downtime contribute to significant savings.
- Example: A nearby supplier providing repair patches and glue can deliver these materials quickly and at a lower cost compared to a supplier located hundreds of miles away.
3. Personalized Service
Local repair professionals are more likely to offer personalized service and tailored solutions to meet your specific needs. They can visit your site, assess the damage firsthand, and recommend the best repair methods based on their understanding of your unique operational environment.
- Example: A local technician visits a facility, evaluates the conveyor belt’s condition, and suggests a custom repair plan that addresses not only the immediate tear but also preventive measures to avoid future issues.
4. Building Long-Term Relationships
Working with local repair services allows you to build strong, long-term relationships. These relationships can lead to better service, preferential pricing, and priority support in times of need. Trust and reliability are key benefits of these ongoing partnerships.
- Example: A company that consistently uses a local repair service for their conveyor belt needs develops a rapport with the technicians, ensuring quick responses and reliable support whenever needed.
5. Supporting the Local Economy
Choosing local services and suppliers helps support the local economy, creating jobs and fostering community growth. This investment in local businesses contributes to a more robust economic environment, which in turn can benefit your own operations.
- Example: By opting for a local conveyor belt repair company, you contribute to the local job market and economic development, which can enhance community resources and services.
Tips on How to Locate Nearby Conveyor Belt Repair Professionals
1. Online Search and Directories
Using online search engines and business directories is one of the most efficient ways to locate nearby conveyor belt repair professionals. Keywords like “conveyor belt repair near me” can yield a list of local businesses specializing in conveyor belt repairs.
- Example: Conducting a Google search for “conveyor belt repair near me” will provide a list of local repair services, complete with contact information and customer reviews.
2. Industry Networks and Referrals
Industry networks and professional associations often have directories or can provide referrals to reputable local repair services. Networking with other businesses in your industry can also lead to recommendations for trusted repair professionals.
- Example: Joining a local manufacturing association can connect you with other businesses that can recommend reliable conveyor belt repair services based on their experiences.
3. Local Trade Shows and Exhibitions
Attending local trade shows and industrial exhibitions is an excellent way to meet repair service providers in person. These events often feature booths and demonstrations from local companies, allowing you to discuss your needs directly with potential repair professionals.
- Example: Visiting a regional industrial trade show can introduce you to several local conveyor belt repair companies, where you can evaluate their offerings and establish initial contact.
4. Community and Business Listings
Local community and business listings, such as those provided by chambers of commerce or local business groups, can be valuable resources for finding nearby repair services. These listings often include detailed information about the businesses, including their specialties and contact details.
- Example: Checking the local chamber of commerce website for business listings under the “industrial services” category can help you find local conveyor belt repair companies.
5. Social Media and Online Forums
Social media platforms and online forums dedicated to industrial maintenance and manufacturing can also be useful in finding local repair services. Participating in discussions and seeking recommendations from other users can lead to discovering reliable local professionals.
- Example: Posting a query on LinkedIn or an industry-specific forum about local conveyor belt repair services can elicit responses from experienced professionals who have worked with nearby companies.
Understanding how to repair torn conveyor belt efficiently often involves finding local repair services and suppliers. The advantages of faster response times, cost-effective solutions, personalized service, long-term relationships, and supporting the local economy make local services an excellent choice. By utilizing online searches, industry networks, trade shows, community listings, and social media, you can locate nearby conveyor belt repair professionals who can provide the timely and effective repairs you need to keep your operations running smoothly.
How to Repair Torn Conveyor Belt: Choosing the Right Conveyor Belt Repair Company
Choosing the right conveyor belt repair company is a crucial step in ensuring that your conveyor system operates efficiently and reliably. Understanding how to repair torn conveyor belt often involves seeking professional help, especially for complex or extensive repairs. This section provides advice on selecting a reliable conveyor belt repair company and outlines what to expect from professional conveyor belt repair services.
Advice on Selecting a Reliable Conveyor Belt Repair Company
Selecting a reliable conveyor belt repair company requires careful consideration of several factors. Here are five key aspects to consider when making your choice:
1. Experience and Expertise
Importance: A company with extensive experience and specialized expertise in conveyor belt repair is more likely to provide high-quality services and effective solutions. Their familiarity with various types of conveyor systems and repair methods ensures they can handle a wide range of issues.
- Example: Look for a company with at least a decade of experience in the industry and a proven track record of successfully repairing different types of conveyor belts.
2. Reputation and Reviews
Importance: A company’s reputation and customer reviews provide valuable insights into their reliability, quality of work, and customer service. Positive feedback from previous clients indicates a higher likelihood of satisfactory service.
- Example: Check online reviews and testimonials on the company’s website and third-party review platforms. A company with consistently high ratings and positive comments is a good indicator of reliability.
3. Range of Services
Importance: Choose a company that offers a comprehensive range of services, including emergency repairs, routine maintenance, and preventive measures. A full-service provider can address all your conveyor belt needs, reducing the need for multiple contractors.
- Example: A company that offers 24/7 emergency repair services, scheduled maintenance programs, and a wide variety of repair techniques is preferable.
4. Certifications and Compliance
Importance: Ensure the company adheres to industry standards and holds relevant certifications. Compliance with safety and quality standards guarantees that the repair work will be performed correctly and safely.
- Example: Verify that the company is certified by industry organizations such as the Conveyor Equipment Manufacturers Association (CEMA) and follows OSHA safety standards.
5. Response Time and Availability
Importance: Quick response times and availability are crucial, especially during emergencies. A company that can respond promptly to repair requests minimizes downtime and operational disruptions.
- Example: Inquire about the company’s average response time for emergency repairs and their availability during weekends and holidays.
What to Expect from Professional Conveyor Belt Repair Services
When you hire a professional conveyor belt repair company, you can expect a range of services designed to ensure efficient and durable repairs. Here are some key aspects of what professional services typically include:
1. Thorough Assessment and Diagnosis
Description: Professional repair services begin with a thorough assessment and diagnosis of the conveyor belt to identify the type and extent of the damage. This step is crucial for determining the most appropriate repair method.
- Example: Technicians will inspect the entire conveyor system, not just the damaged area, to identify any underlying issues that could contribute to future problems.
2. Customized Repair Solutions
Description: Based on the assessment, the repair company will provide customized repair solutions tailored to your specific needs. They will consider factors such as the type of belt, the operating environment, and the nature of the damage.
- Example: For a heavily damaged belt in a high-wear environment, the company might recommend using a combination of repair patches and clips to ensure a robust and lasting repair.
3. High-Quality Materials and Tools
Description: Professional repair companies use high-quality materials and specialized tools to perform repairs. This ensures the durability and reliability of the repaired belt.
- Example: The company will use industrial-grade repair patches, adhesives, and clips designed to withstand the operational stresses of your conveyor system.
4. Skilled and Trained Technicians
Description: Expect skilled and trained technicians who have the expertise to perform repairs efficiently and correctly. Their training and experience enable them to handle complex repairs and unexpected challenges.
- Example: Technicians will be certified and regularly trained in the latest repair techniques and safety protocols to ensure high-quality service.
5. Preventive Maintenance Advice
Description: In addition to performing repairs, professional companies often provide advice on preventive maintenance to help you avoid future issues. They may recommend regular inspections, lubrication schedules, and other maintenance practices.
- Example: After completing the repair, the company might suggest a quarterly maintenance program to monitor the belt’s condition and address minor issues before they escalate.
6. Detailed Documentation and Reporting
Description: Professional repair services include detailed documentation and reporting of the work performed. This includes a summary of the damage, the repair methods used, and any recommendations for future maintenance.
- Example: The company will provide a comprehensive report that outlines the repair process, materials used, and any follow-up actions needed to ensure the longevity of the conveyor belt.
Knowing how to repair torn conveyor belt effectively often involves selecting the right professional repair company. By considering factors such as experience, reputation, range of services, certifications, and response time, you can choose a reliable partner to handle your repair needs. Professional conveyor belt repair services offer thorough assessments, customized solutions, high-quality materials, skilled technicians, preventive maintenance advice, and detailed documentation. These services ensure that your conveyor system remains operational, efficient, and reliable, minimizing downtime and extending the life of your equipment.
FAQs About How to Repair Torn Conveyor Belt
To repair a ripped conveyor belt, start by assessing the extent of the damage. For minor tears, you can use conveyor belt repair tape. Clean the damaged area with a solvent to remove dirt and debris, ensuring the surface is dry before applying the tape. Measure and cut the tape to cover the tear, then press it firmly onto the belt, using a roller to eliminate air bubbles and ensure a strong bond.
For larger tears, a more robust solution like a repair patch or clips might be necessary. Clean the damaged area, apply adhesive to both the patch and the belt, and press the patch over the tear. Use clamps to hold the patch in place while the adhesive cures. Ensure the repair is secure before resuming operations by conducting a test run at a slow speed to check for any issues.
Professional repair services can also be employed for extensive or complex damages, providing a thorough assessment and customized repair solutions to ensure the longevity of the conveyor belt.
The best glue for conveyor belt repair depends on the type and extent of the damage as well as the belt material. Here are some options:
Contact Adhesives: These are quick-drying and ideal for minor repairs, providing strong initial tack and good bonding strength. They are suitable for small surface cuts and abrasions.
Two-Part Epoxy Adhesives: Known for their superior strength and durability, these adhesives are perfect for extensive repairs involving large tears or holes. They require mixing before application and offer a robust bond once cured.
Urethane Adhesives: These provide flexibility and resistance to wear, chemicals, and temperature variations. They are ideal for belts that experience significant flexing and twisting, such as in mining or heavy industrial applications.
Cyanoacrylate Adhesives (Super Glue): These fast-acting adhesives are suitable for small, precise repairs. They form a strong bond quickly, making them perfect for minor cuts or nicks.
Rubber Cement: Made of elastic polymers, rubber cement provides a flexible bond that can stretch and flex with the belt, making it suitable for temporary repairs or belts that experience frequent flexing.
Choosing the right adhesive ensures the repair is effective and durable, maintaining the integrity and performance of the conveyor belt.
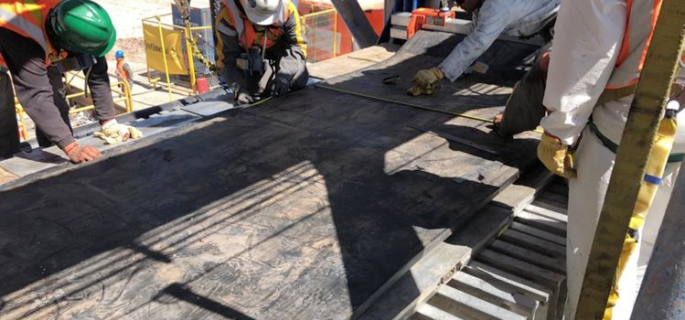
Splicing a conveyor belt involves joining two ends of the belt to form a continuous loop. The process can be done through various methods, including mechanical splicing and vulcanized splicing.
Mechanical Splicing: This method uses metal fasteners to join the belt ends. It is quick and easy, suitable for most belt types, and can be done with basic tools. The steps include:
Align the belt ends and mark the splicing area.
Cut the belt ends squarely and evenly.
Position the fasteners along the marked area and insert the fastener pins.
Secure the fasteners using a splicing tool, ensuring even pressure across the belt width.
Vulcanized Splicing: This method provides a more durable and seamless join. It involves using heat and pressure to bond the belt ends together. The steps include:
Align and mark the belt ends, then cut them to match the required splice pattern.
Prepare the splicing area by grinding or sanding to ensure a smooth surface.
Apply vulcanizing compound and align the belt ends in a press.
Apply heat and pressure for a specified time to cure the compound and bond the belt ends.
Both methods require precise alignment and preparation to ensure a strong and durable splice.
Conveyor belts can rip due to several factors, often related to the operational environment and the materials being transported. Common causes include:
Sharp Objects: Materials with sharp edges can puncture or tear the belt, especially if the belt is moving at high speeds or carrying heavy loads.
Overloading: Excessive weight can strain the belt beyond its capacity, leading to tears or rips. Ensuring the load is within the belt’s designed capacity can prevent such damage.
Misalignment: Misaligned conveyor systems can cause the belt to run against the conveyor structure, leading to fraying and eventual tearing. Regular alignment checks can mitigate this issue.
Wear and Tear: Continuous use without adequate maintenance can cause the belt to deteriorate over time. Regular inspections and preventive maintenance can help identify and address wear before it leads to rips.
Chemical Exposure: Exposure to harsh chemicals can weaken the belt material, making it more susceptible to tearing. Using belts resistant to the chemicals in your operational environment can prevent this.
Understanding these causes can help in implementing preventive measures and ensuring the longevity of the conveyor belt. Regular maintenance, proper loading practices, and using the right belt for the application are crucial steps in preventing rips.
Last Updated on July 8, 2024 by Jordan Smith
Jordan Smith, a seasoned professional with over 20 years of experience in the conveyor system industry. Jordan’s expertise lies in providing comprehensive solutions for conveyor rollers, belts, and accessories, catering to a wide range of industrial needs. From initial design and configuration to installation and meticulous troubleshooting, Jordan is adept at handling all aspects of conveyor system management. Whether you’re looking to upgrade your production line with efficient conveyor belts, require custom conveyor rollers for specific operations, or need expert advice on selecting the right conveyor accessories for your facility, Jordan is your reliable consultant. For any inquiries or assistance with conveyor system optimization, Jordan is available to share his wealth of knowledge and experience. Feel free to reach out at any time for professional guidance on all matters related to conveyor rollers, belts, and accessories.

